
Protect Your Metal Gate: The Secret to a Better Paint Job
Share This Blog
Protect Your Metal Gate: The Secret to a Better Paint Job
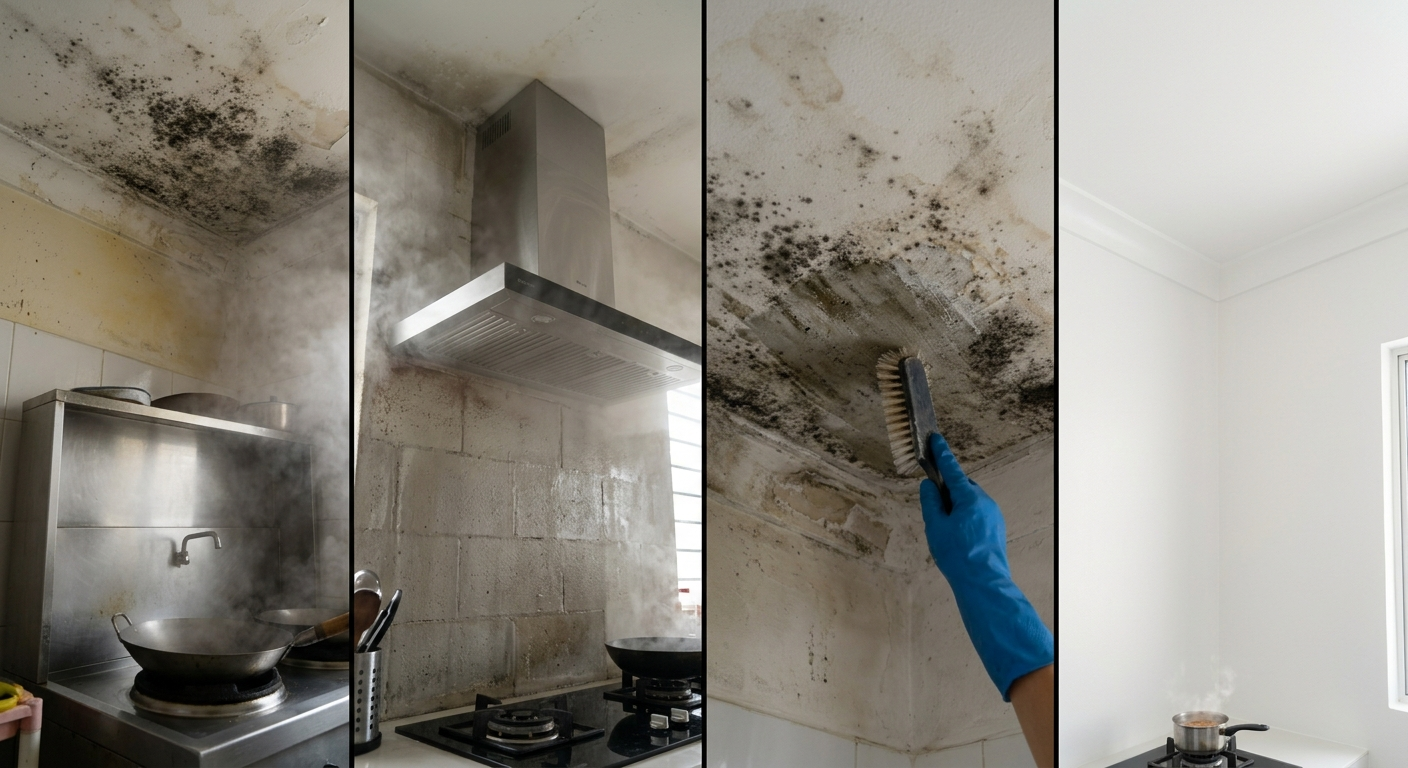
For anyone who loves Malaysian food, the wet kitchen is the heart of the home. It is the birthplace of sambal tumis, rich coconut broths, and high-heat stir-fries that demand authentic wok hei. However, this culinary passion comes with a hidden structural price. The sheer volume of intense heat, airborne cooking oils, and heavy steam generated daily creates a punishing environment for interior surfaces.
In many Malaysian homes—ranging from classic double-storey terrace houses in Selangor to modern high-rise condominiums in Penang—the wet kitchen is built to bear the brunt of heavy cooking. Yet, homeowners frequently find themselves fighting a losing battle against bubbling plaster, peeling topcoats, and stubborn black spots on the ceiling.
Understanding why standard interior finishes fail under these conditions is the first step toward reclaiming your space. By shifting your approach from superficial scrub-downs to deep structural prevention, you can permanently banish the wet kitchen blues.
The Unique Environment of the Malaysian Wet Kitchen
To solve the twin issues of mould growth and peeling paint, we must first look at the atmospheric conditions of a typical Malaysian cooking zone. Unlike Western-style dry kitchens, which mostly handle light baking or assembly, a wet kitchen is an active industrial environment inside a residential footprint.
When you deep-fry or boil a slow-simmering broth for hours, your kitchen experiences a localized humidity crisis. The air rapidly saturates with water vapor mixed with vaporized cooking fats. Because many wet kitchens are situated at the back of the house or in compact, semi-enclosed extensions, natural cross-ventilation is often limited.
As this hot, moisture-laden air rises, it hits cooler surfaces like your flat plaster ceiling and upper concrete blockwork. The water vapor undergoes condensation, leaving behind a sticky, damp residue composed of water and organic oils. This residue does not simply evaporate. It sinks directly into porous masonry layers, turning your walls into an open invitation for microscopic fungal colonies.
Why Your Cooker Hood Cannot Solve the Problem Alone
A common misconception among homeowners is that installing a high-suction cooker hood or a powerful exhaust fan will completely protect their walls and ceilings from dampness. While a premium exhaust system is essential for removing heavy smoke and a portion of airborne grease, it cannot achieve absolute moisture extraction.
Airborne steam disperses rapidly. The moment water boils or a hot dish is transferred out of the pan, a massive volume of vapor escapes into the wider room before the hood’s intake can capture it. Furthermore, cooker hoods do nothing to address the structural pockets of dead air where humidity naturally pools.
The worst of these pockets exists right behind and above your custom wooden cabinets. Upper cabinetry is typically mounted directly against bare or standard-painted masonry walls. This creates a narrow, dark, and unventilated gap. When cooking steam drifts into this gap, it gets completely trapped.
Without airflow to dry it out, the concrete absorbs this moisture day after day. When night falls and the room cools, this warm, damp cavity becomes the ultimate incubator for toxic black mould spores. By the time you notice black spots creeping out from the edges of your beautiful cabinetry, the root network has already compromised the structural wall behind it.
The Real Reason Paint Peels and Bubbles in High-Heat Zones
Peeling paint is more than just an aesthetic annoyance; it is a sign of system failure caused by moisture pressure. When standard interior wall paint is exposed to constant cycles of wetting and drying, the paint film expands and contracts.
Over time, this continuous physical stress destroys the paint’s adhesion to the underlying plaster. More importantly, when moisture penetrates beneath a conventional paint layer, it saturates the porous concrete wall. As the kitchen heats up during your next cooking session, that trapped water turns into vapor and tries to escape.
This creates outward pressure behind the paint film, leading to unsightly bubbling, blistering, and eventual flaking. If the paint you used lacks high alkaline resistance, the natural salts inside the concrete masonry will leach out alongside the moisture. This process, known as efflorescence, leaves behind a white, powdery residue that completely destroys any bond between the wall and your topcoat.
The Limitations of Bleach and Surface Cleaning
When black mould patches inevitably show up on the kitchen ceiling, the instinctive response is to grab a bottle of heavy-duty chemical bleach, a rough sponge, and a stiff brush. You scrub the area until the masonry looks clean, believing the issue is solved.
Unfortunately, household cleaners only address what is visible on the surface. Mould is not a simple stain; it is a living organism that develops deep, root-like structures called hyphae. These microscopic roots dig far beneath the top layer of paint, anchoring themselves securely inside the internal concrete and plasterwork.
Washing the wall merely scrapes off the visible tops of the fungal colonies. The deep-seated root network remains alive, intact, and highly active. The moment you boil water or cook another meal, the renewed humidity reactivates these hidden roots. Within a matter of weeks, the black patches return, often spreading across a wider area than before.
Breaking the Cycle: The Science of Active Biocidal Protection
To stop mould and peeling paint for good, you must treat your wet kitchen walls with a finish that actively alters the chemical environment of the surface. This requires moving away from passive decorative paints and upgrading to specialized, high-performance anti-fungal emulsions explicitly engineered for high-humidity climates.
Premium anti-mould paint formulas do not just act as a barrier; they incorporate a resilient, non-mercurial biocide shield throughout the paint matrix. This technology provides heavy-duty defense across three distinct layers:
- An Inhospitable Surface Profile: The paint cures into a tight, moisture-resistant film that prevents water droplets and cooking grease from easily absorbing into the underlying plasterwork.
- Active Biocidal Defenses: The integrated formula continuously interrupts the cellular division of any airborne fungal spores that land on the wall, neutralizing them before they can sprout roots.
- Long-Term Scrub Resistance: These finishes are designed to withstand regular wipe-downs, ensuring that your routine cleaning does not wash away the active anti-fungal properties.
For indoor areas with minimal airflow, look for formulas that carry official environmental certifications, such as the Singapore Green Label or the SIRIM Eco-Label in Malaysia. These certifications ensure that while the paint delivers heavy-duty protection against dampness, it remains completely zero-VOC and virtually odorless, making it perfectly safe for your family.
Your Step-by-Step Wet Kitchen Remediation Guide
If you want a flawless finish that lasts for years instead of weeks, you must follow a disciplined, methodical preparation sequence. Painting directly over an active mould patch or a damp wall is a guarantee for premature peeling and system failure.
Step 1: Sterilize the Underlying Masonry
Before picking up a paint roller, you must completely neutralize the deep-seated root networks. Wash the affected areas thoroughly with a dedicated fungicidal wash rather than simple household bleach. Allow the solution to soak deep into the plaster to kill the hidden hyphae, then wipe away the residue.
Step 2: Ensure Complete Structural Drying
The concrete blockwork must be bone-dry before you apply any new product. Open all doors, set up mechanical fans, or use a portable dehumidifier in the space for at least 24 to 48 hours after washing.
Step 3: Apply an Alkaline-Resistant Sealer
Apply one thorough coat of a premium water-based wall sealer. This layer is crucial for landed properties and older homes because it locks down residual contaminants, resists natural concrete alkalinity, and creates a uniform profile that enhances topcoat adhesion.
Step 4: Lay Down the Anti-Mould Topcoats
Finish your project by applying two full coats of a trusted regional standard like Seamaster AIDA Fight Mold or Wall-Tex Emulsion Paint 7700. Ensure you allow the exact specified drying time between coats so the protective biocide shield can form correctly.
Protect Your Culinary Haven for the Long Run
You do not have to accept peeling paint and unsightly black spots as an unavoidable consequence of enjoying authentic Malaysian cooking. By pairing disciplined surface preparation with specialized paint technology, you can protect your wet kitchen from structural damage. Invest the time in proper remediation today, and keep your kitchen fresh, clean, and completely spore-free for years to come.
Your space, your colours.

Aida - SMP Colour & Paint Specialist
Sharing practical house painting tips, smart techniques, and real-world industry insights.
Table of Contents
- Wet Kitchen Blues: Stopping Mould and Peeling Paint Fueled by Heavy Malaysian Cooking
- The Unique Environment of the Malaysian Wet Kitchen
- Why Your Cooker Hood Cannot Solve the Problem Alone
- The Real Reason Paint Peels and Bubbles in High-Heat Zones
- The Limitations of Bleach and Surface Cleaning
- Breaking the Cycle: The Science of Active Biocidal Protection
- Your Step-by-Step Wet Kitchen Remediation Guide
- Protect Your Culinary Haven for the Long Run


